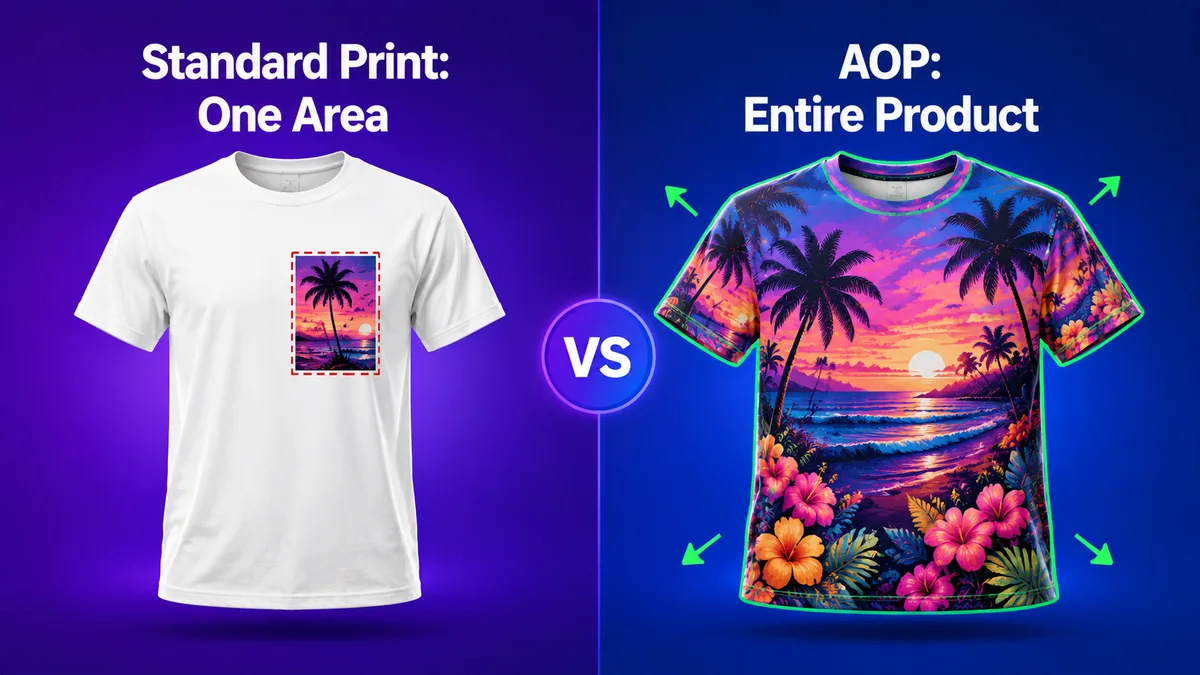
Designing for all-over-print is different from designing for a regular T-shirt. With a standard print, you create one rectangular graphic and drop it on the chest. With AOP, your canvas is the entire product — front, back, sleeves, seams, and edges. Every inch matters.
That sounds intimidating, but it doesn't have to be. The truth is, anyone can learn to create great AOP designs — you just need to understand a few key principles that don't apply to regular printing.
In this guide, we'll walk you through exactly how to design all-over-print products step by step: from understanding the product template and choosing the right dimensions, to creating seamless patterns and picking colors that pop. By the end, you'll have everything you need to create your first AOP design — even if you've never designed anything before.
If you're not sure what all-over-print is yet, start with our beginner's guide to AOP to understand the process before diving into design.
Why AOP Design Is Different
Before we get into the how-to, let's clarify what makes designing for AOP unique.
With a standard DTG or screen print, you're designing for one flat area — usually a rectangle on the chest or back of a finished garment. The rest of the shirt is a blank canvas that you don't touch.
With all-over-print, you're designing for the entire three-dimensional product. Your artwork will wrap around shoulders, flow across seams, and continue down sleeves. The pattern needs to look cohesive from every angle — not just from the front.
This means you need to think about:
-
How the design wraps around the product's shape
-
Where the seams fall and how your pattern crosses them
-
How the fabric stretches and affects the printed image
-
What the design looks like from the back, sides, and sleeves — not just the front
It's more complex, but also far more creative. And once you understand the system, it becomes second nature.
Step 1: Start With the Product Template
Every AOP product comes with a design template — a flat layout that shows every printable panel of the product unfolded. Think of it like a sewing pattern: it shows the front panel, back panel, sleeves, collar, and any other pieces, all laid out flat.
Your job is to fill this template with your artwork.
Where to get templates: Your POD supplier should provide downloadable templates for every product. These typically come in PSD (Photoshop) or AI (Illustrator) format with clearly labeled zones for each panel.
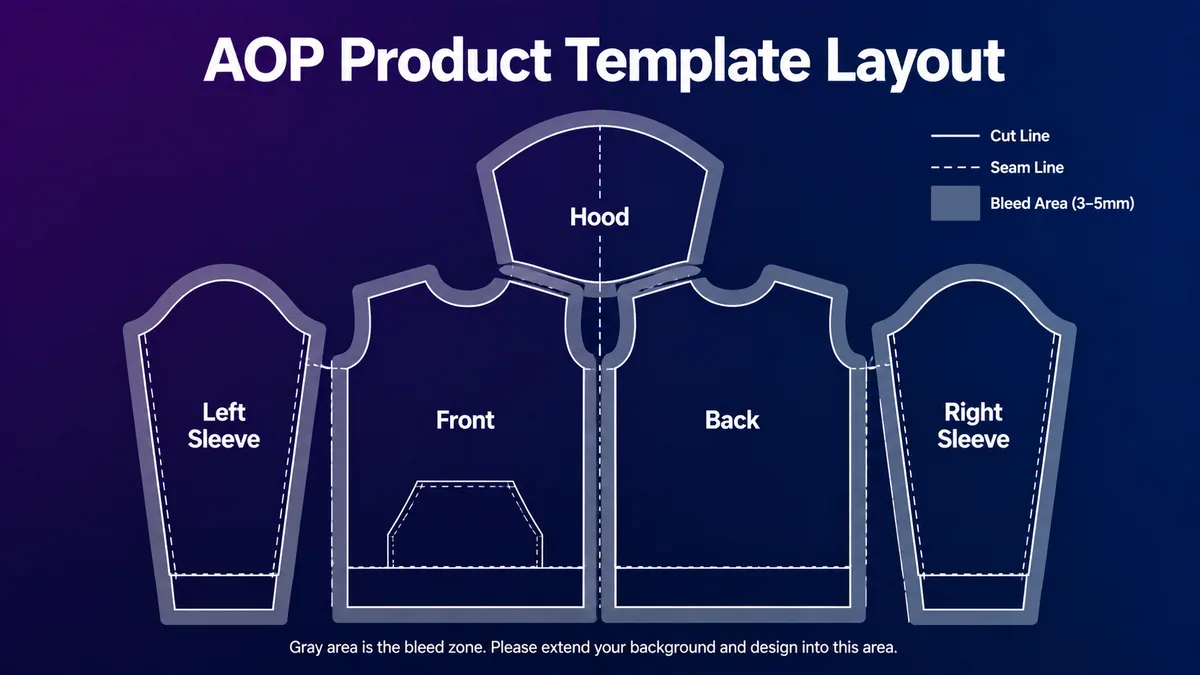
What to look for in a template:
-
Panel boundaries — lines showing where each piece of the garment starts and ends
-
Seam lines — dashed lines showing where fabric pieces will be stitched together
-
Safe zones — areas where key design elements should be placed (away from seams and edges)
-
Bleed areas — extra space beyond the cut line that ensures your design reaches the very edge
Pro tip: Don't start designing until you have the correct template for the exact product you're selling. A hoodie template is completely different from a leggings template — using the wrong one will result in misaligned patterns and wasted effort.
Tools like Yoycol's 3D mockup generator let you upload a design and instantly see how it maps onto a real product in 3D — which saves you from discovering alignment issues after you've already listed the product.
Step 2: Get the Dimensions and Resolution Right
AOP designs cover a much larger area than standard prints, which means your file needs to be significantly bigger.
Standard resolution: Always design at 300 DPI (dots per inch). Anything lower and the print will look blurry or pixelated, especially on large panels like hoodie backs.
Common template dimensions (approximate):
|
Product |
Template Size (approx.) |
Pixel Dimensions at 300 DPI |
|---|---|---|
|
T-Shirt (full) |
36" × 28" |
10,800 × 8,400 px |
|
Hoodie (full) |
42" × 34" |
12,600 × 10,200 px |
|
Leggings |
28" × 40" |
8,400 × 12,000 px |
|
Backpack |
18" × 24" |
5,400 × 7,200 px |
These are approximate — always use the exact dimensions specified in your supplier's template.
File format: Save your final design as a PNG (for transparency support) or high-quality JPEG. Some suppliers accept TIFF or PSD files. Check your supplier's requirements before you export.
File size: Full AOP templates at 300 DPI can easily be 100–300 MB in Photoshop. Make sure your computer has enough RAM to handle large files — or use cloud-based design tools that handle the processing for you.
Step 3: Choose Your Design Approach
There are three main approaches to AOP design. You don't need to pick just one — many great products combine multiple approaches.
Approach A: Seamless Repeating Pattern
The most popular and beginner-friendly approach. You create a single pattern tile that repeats across the entire product, like wallpaper.
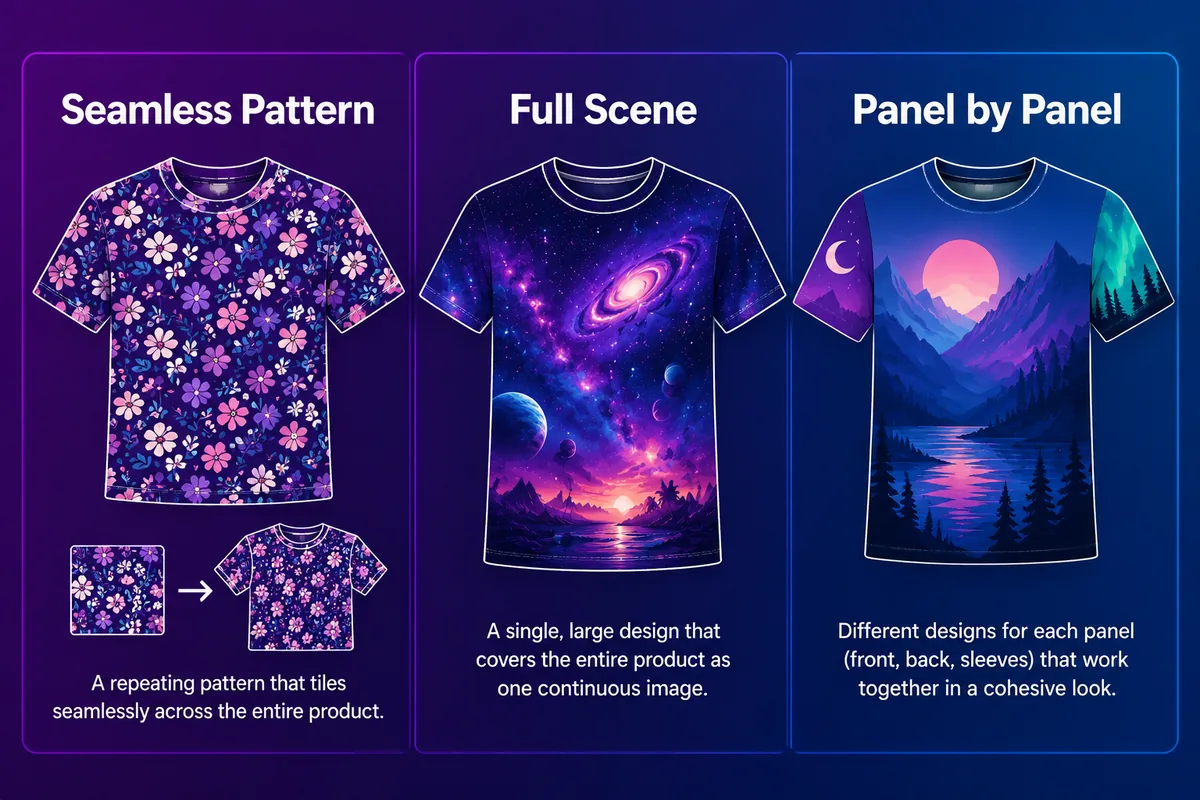
Best for: Florals, geometric shapes, abstract textures, polka dots, animal prints, food patterns.
How to do it:
-
Create a square tile (e.g., 3000 × 3000 px) with your design elements.
-
Make sure the edges of your tile connect seamlessly — when you place two copies side by side, the pattern should flow without visible breaks.
-
Fill your product template with this repeating tile.
Beginner tip: Most design tools (Photoshop, Illustrator, Canva Pro, PatternedAI) have built-in "pattern maker" features that automatically create seamless tiles. Use them.
Approach B: Full-Scene Composition
Instead of a repeating pattern, you create one large artwork that covers the entire product as a single image — like wrapping a painting around a garment.
Best for: Galaxy/space scenes, landscapes, cityscapes, murals, photo-realistic artwork.
How to do it:
-
Open your product template at full resolution.
-
Place your main focal point on the front panel (this is what people see first).
-
Extend the scene across the back, sleeves, and other panels so it flows naturally.
-
Make sure the colors and elements transition smoothly across seam lines.
Key consideration: The front panel should have the strongest visual impact. The back can carry a continuation or a secondary focal point. Sleeves and edges should blend naturally.
Approach C: Panel-by-Panel Design
You treat each panel of the product as its own design zone and place different elements on different panels.
Best for: Streetwear, branded merchandise, products with text/numbers, sports jerseys.
How to do it:
-
Open the template and identify each panel.
-
Design each panel individually — e.g., a bold graphic on the front, a logo on the back, complementary patterns on the sleeves.
-
Use a consistent color palette across all panels to keep the design cohesive.
Key consideration: Even though each panel has its own design, the overall product should still feel unified. Use shared colors, fonts, or visual elements to tie everything together.
Step 4: Design for the Fabric (Color and Detail Tips)
AOP uses dye-sublimation on polyester fabric, which behaves differently from printing on paper or cotton.
Colors:
-
Go bold. Dye-sublimation produces incredibly vibrant colors. Take advantage of it — bright, saturated designs look significantly better than muted, pastel ones.
-
Dark backgrounds work great. Unlike DTG on dark garments (which needs a white underbase), sublimation on white polyester can produce deep blacks and rich dark tones natively.
-
Watch out for screen-to-fabric shifts. Colors on your monitor may look slightly different on fabric. If possible, order a sample before listing the product.
Detail:
-
Avoid ultra-fine lines. Lines thinner than 1mm may not print cleanly on fabric.
-
Text should be large enough to read. Any text in your design should be at least 12pt at the final print size.
-
Photos need high contrast. Sublimation can slightly soften fine details in photographs. Boost contrast and sharpen key elements.
Step 5: Handle Seams and Edges Properly
This is where most beginners make mistakes.
When your design crosses a seam line, the two fabric panels need to align perfectly after sewing. If your pattern is slightly off, the result looks sloppy — like a jigsaw puzzle with mismatched pieces.
How to handle seams:
-
Use the seam lines in the template as guides. These show you exactly where panels will be stitched together.
-
Avoid placing critical design elements (faces, text, logos) directly on seam lines. If the alignment is even slightly off during sewing, it becomes very noticeable.
-
For repeating patterns: make sure the pattern scale is consistent across adjacent panels so it flows naturally over the seam.
-
For scene designs: use elements that can tolerate slight misalignment — gradients, abstract textures, and organic shapes (like clouds or waves) are forgiving. Hard geometric lines and stripes are not.
Bleed areas:
Most templates include a bleed zone — extra space beyond the cut line. Always extend your background color or pattern into the bleed area. If you don't, you risk thin white lines appearing at the edges of the finished product.
Step 6: Preview With 3D Mockups
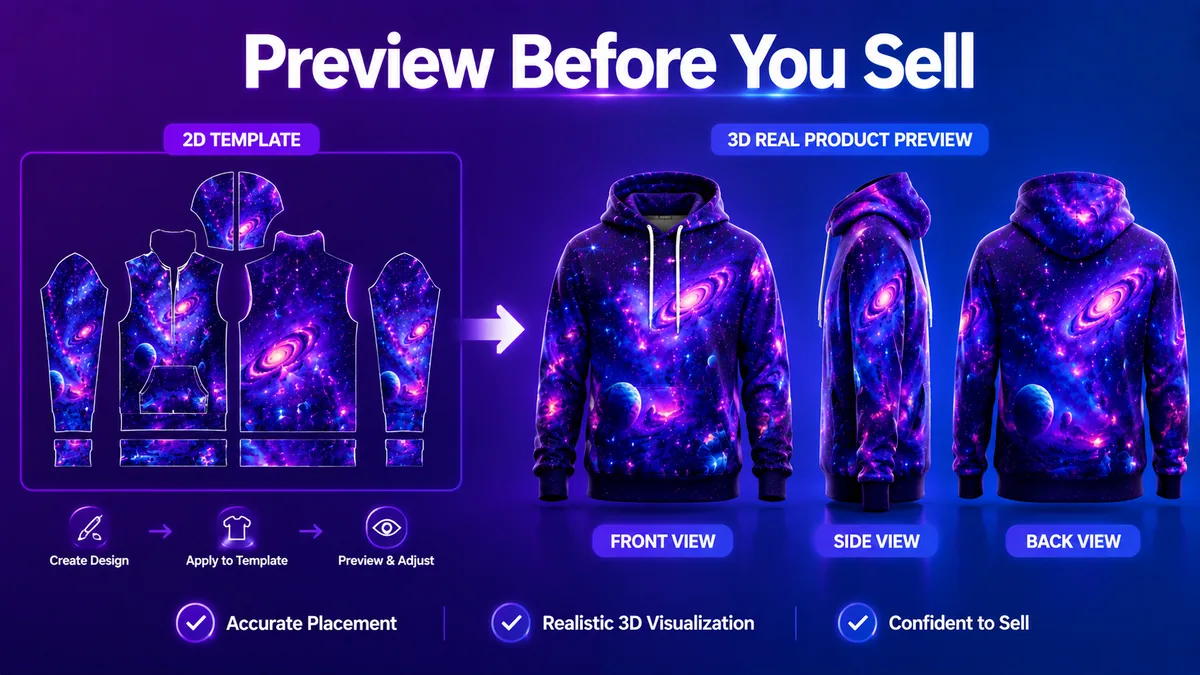
Before you finalize your design and list the product, you need to see how it actually looks on a real product.
A flat template can look great on your screen but terrible when wrapped around a 3D garment. Wrinkles, stretches, and curves can distort your design in ways you can't predict from a flat file.
How to create mockups:
-
Use your supplier's built-in tools. Many POD platforms generate 3D mockups automatically when you upload a design. Yoycol's free 3D design tool lets you rotate, zoom, and view the product from every angle before you commit.
-
Check every angle. Look at the front, back, sides, and sleeves. Does the pattern flow naturally? Are there any awkward breaks at the seams?
-
Zoom in on details. Check that text is readable, fine lines are clean, and colors look vibrant.
-
Test on multiple products. The same design can look very different on a hoodie vs. a pair of leggings. Preview it on the actual product you plan to sell.
This step takes 5 minutes but saves you from listing a product with a broken design — and dealing with customer complaints later.
Free Tools for Designing All-Over-Print Products
You don't need expensive software to create great AOP designs. Here are the best tools, from free to paid:
Free / Low-Cost:
-
Canva (Pro) — pattern maker, templates, and easy drag-and-drop design. Great for repeating patterns.
-
Photopea — a free browser-based Photoshop alternative. Handles large PSD templates.
-
PatternedAI — generates seamless patterns from text prompts using AI.
-
GIMP — free open-source image editor. Handles large files and layers.
Professional:
-
Adobe Photoshop — the industry standard for AOP design. Best for full-scene compositions and photo editing.
-
Adobe Illustrator — best for vector-based patterns and panel-by-panel design. Scales without quality loss.
-
Affinity Designer — a one-time-purchase alternative to Photoshop/Illustrator with similar capabilities.
AI-Powered:
-
Midjourney / DALL-E — generate full-coverage artwork from text prompts, then upscale and map onto templates.
-
Placeit — mockup generator with AOP templates built in.
For a broader comparison of design tools for POD, our POD design tools guide covers the full landscape.
Common AOP Design Mistakes to Avoid
Even experienced designers make these mistakes when they first work with all-over-print:
-
Ignoring the template. Designing without the correct product template leads to misaligned panels and cut-off elements. Always start with the supplier's template.
-
Low resolution. AOP covers a large area. A design that looks sharp at 72 DPI on your screen will be a blurry mess at print size. Always use 300 DPI.
-
Placing key elements on seams. Faces, logos, and text that straddle a seam line will look broken if the alignment isn't perfect. Keep them in safe zones.
-
Not checking the bleed area. If your design doesn't extend into the bleed zone, you'll get thin white lines at the edges.
-
Designing only for the front. AOP covers the whole product. A beautiful front with a blank or ugly back is a missed opportunity — and looks unfinished.
-
Using copyrighted material. Don't use trademarked characters, brand logos, or copyrighted images in your designs. This applies to all POD products, but AOP products are more visible and more likely to attract takedown notices.
-
Skipping the mockup. Always preview your design in 3D before listing. What looks good flat may not work on a curved, wrinkled surface.
Your First AOP Design: A Quick-Start Checklist
Ready to create your first design? Follow this checklist:
-
Download the correct product template from your supplier
-
Set your canvas to the template dimensions at 300 DPI
-
Choose your approach: repeating pattern, full scene, or panel-by-panel
-
Create your design, keeping seam lines and bleed areas in mind
-
Use bold, saturated colors — sublimation rewards vibrancy
-
Keep text and logos away from seam lines
-
Extend your design into all bleed areas
-
Preview the design on a 3D mockup from every angle
-
Order a sample if possible before listing
-
List your product and start selling
For inspiration on which products to design for first, our top 10 best-selling AOP products guide covers which items are moving in the POD market right now.
Ready to create your first all-over-print design? Start designing for free with Yoycol →
Want to learn more about the AOP process? Read our complete All-Over-Print guide for everything on production, pricing, and scaling your AOP store.