One of the most common reasons all-over-print designs fail in production? Wrong dimensions.
Not bad design. Not poor quality. Just a file that's 200 pixels too small or missing the bleed area — resulting in white edges, stretched patterns, or designs that don't align at the seams.
This guide gives you everything you need to create AOP design files that print perfectly every time: exact dimensions for every product type, file format requirements, free tools to create templates, and common mistakes to avoid.
If you're new to all-over-print and want to understand the technology first, our what is all-over-print guide explains how the process works.
Why AOP Design Templates Are Different from Regular Designs
A standard t-shirt design is simple: one rectangular image placed on the chest area. Done.
All-over-print is fundamentally different:
- The design covers the entire product — front, back, sleeves, hood, every visible surface
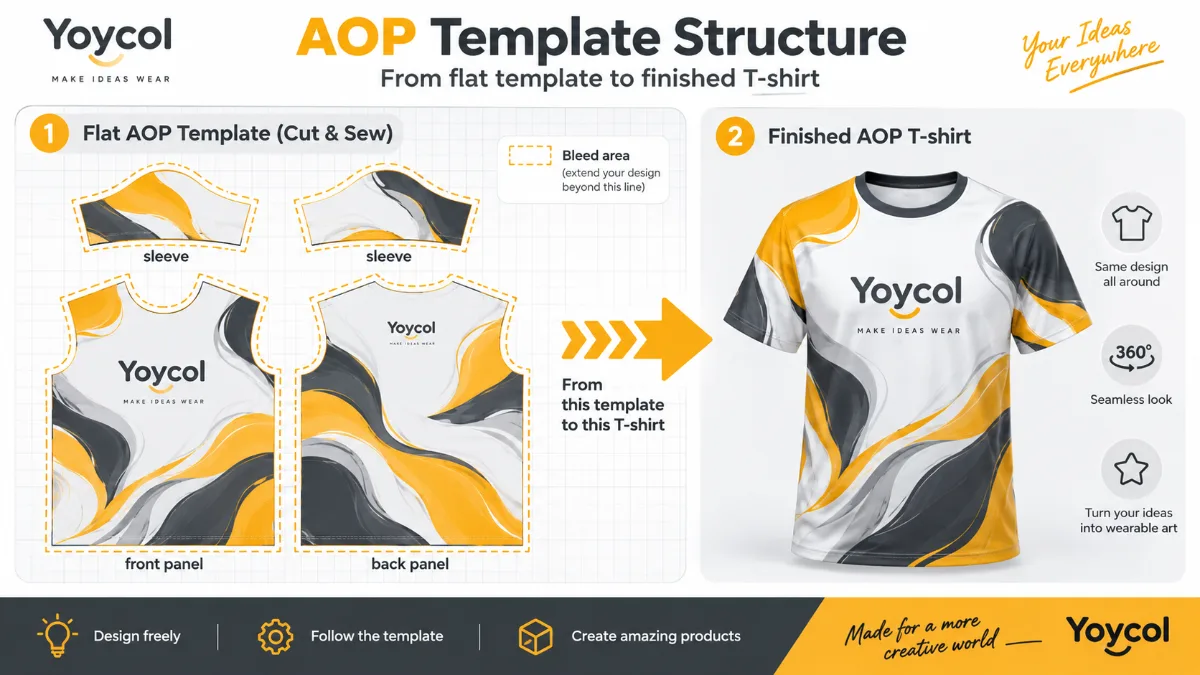
- The design is printed on flat fabric BEFORE it's cut and sewn — so your template looks like an unfolded sewing pattern, not a finished garment
- Seam alignment matters — patterns that cross seam lines need to match up perfectly after the garment is assembled
- Bleed area is required — extra design extends beyond the cut line to prevent white edges
This means your design template looks like a flat, unfolded map of the entire product. It's not intuitive at first — but once you understand the structure, it becomes straightforward.
Design Template Dimensions by Product Type
Here are the exact dimensions you need for the most popular AOP products. These are based on standard POD supplier specifications (always check your specific supplier's template for exact measurements).
T-Shirts & Tops
| Product | Template Size (px at 300 DPI) | Template Size (inches) | Bleed Area |
|---|---|---|---|
| AOP T-Shirt (unisex) | 6000 × 7200 px | 20" × 24" | 2-3cm all sides |
| AOP Long Sleeve | 7200 × 8400 px | 24" × 28" | 2-3cm all sides |
| AOP Tank Top | 5400 × 7200 px | 18" × 24" | 2-3cm all sides |
| AOP Polo Shirt | 6000 × 7200 px | 20" × 24" | 2-3cm all sides |
Hoodies & Sweatshirts
| Product | Template Size (px at 300 DPI) | Template Size (inches) | Bleed Area |
|---|---|---|---|
| AOP Pullover Hoodie | 8400 × 9600 px | 28" × 32" | 3cm all sides |
| AOP Zip Hoodie | 9000 × 9600 px | 30" × 32" | 3cm all sides |
| AOP Crewneck Sweatshirt | 7800 × 9000 px | 26" × 30" | 3cm all sides |
Leggings & Pants
| Product | Template Size (px at 300 DPI) | Template Size (inches) | Bleed Area |
|---|---|---|---|
| AOP Leggings | 6000 × 9600 px | 20" × 32" | 2cm all sides |
| AOP Yoga Pants | 6000 × 9600 px | 20" × 32" | 2cm all sides |
Blankets & Home
| Product | Template Size (px at 300 DPI) | Template Size (inches) | Bleed Area |
|---|---|---|---|
| AOP Flannel Blanket (M) | 6000 × 7200 px | 20" × 24" | 3cm all sides |
| AOP Flannel Blanket (L) | 7200 × 9000 px | 24" × 30" | 3cm all sides |
| AOP Beach Towel | 7200 × 10800 px | 24" × 36" | 3cm all sides |
Bags & Accessories
| Product | Template Size (px at 300 DPI) | Template Size (inches) | Bleed Area |
|---|---|---|---|
| AOP Backpack | 6000 × 7200 px | 20" × 24" | 2cm all sides |
| AOP Tote Bag | 5400 × 6000 px | 18" × 20" | 2cm all sides |
Important: These are standard dimensions. Always download the specific template from your POD supplier before designing. Yoycol provides design templates for every product in their catalog — each one pre-sized with the correct bleed area and seam lines marked.
File Format Requirements
Every POD supplier has slightly different requirements, but these are the universal standards:
| Spec | Requirement | Why It Matters |
|---|---|---|
| Resolution | 300 DPI (dots per inch) | Lower DPI = blurry prints. 300 DPI is print industry standard. |
| Color mode | RGB (not CMYK) | Sublimation printing uses RGB. CMYK files will shift colors. |
| File format | PNG or JPEG | PNG preserves quality better. JPEG is smaller file size. |
| Color profile | sRGB | Most POD suppliers use sRGB. Other profiles cause color shifts. |
| Max file size | Usually 20-50MB | Larger files may be rejected by upload systems. |
| Background | Not needed — full coverage | AOP covers the entire product, so no transparent backgrounds needed. |
The Bleed Area Rule
This is the #1 mistake new AOP designers make.
Bleed is the extra design area that extends beyond the cut line. When the fabric is cut, the bleed ensures your design goes all the way to the edge — no white borders.
Rule: Your design must extend 2-3cm (about 0.75-1 inch) beyond every cut edge. Don't put important design elements in the bleed area — they might get cut off.
For a complete guide on AOP design requirements and common mistakes, our how to design all-over-print products guide covers everything in detail.
Free Tools for Creating AOP Design Templates
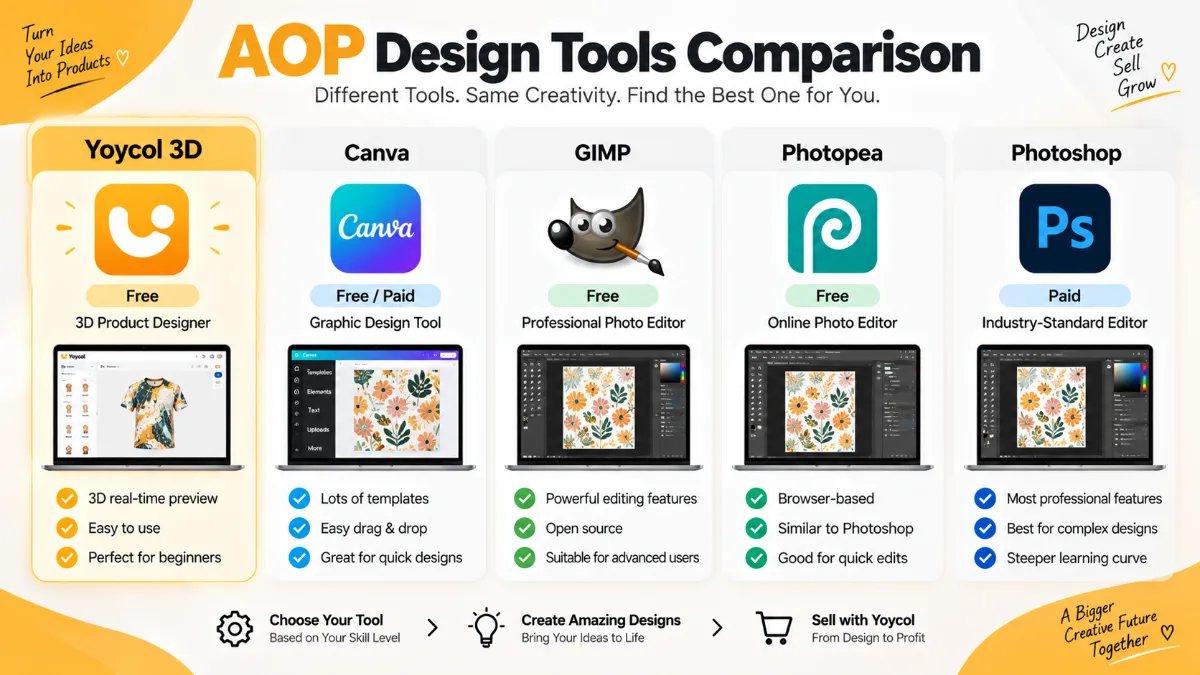
You don't need expensive software to create AOP designs. Here are the best free and affordable tools:
Free Tools
| Tool | Best For | Pros | Cons |
|---|---|---|---|
| Yoycol 3D Mockup Generator | Preview & design in-browser | Free, real-time 3D preview, product-specific templates | Less control than Photoshop |
| Canva (Free) | Simple patterns, text-based designs | Easy to use, thousands of templates | Limited for complex AOP layouts |
| GIMP | Photoshop alternative (free) | Full-featured, supports layers | Steeper learning curve |
| Photopea | Browser-based Photoshop clone | Free, supports PSD files | Can lag with large files |
| Inkscape | Vector-based designs | Free, scalable vector graphics | Not ideal for photographic designs |
Paid Tools (Worth the Investment)
| Tool | Price | Best For |
|---|---|---|
| Adobe Photoshop | $22.99/month | Industry standard for AOP design |
| Adobe Illustrator | $22.99/month | Vector patterns, seamless repeats |
| Procreate (iPad) | $12.99 one-time | Hand-drawn designs, illustration |
| Placeit | $14.95/month | Mockup generation, no Photoshop needed |
The Fastest Workflow (Recommended for Beginners)
- Download the product template from your POD supplier (e.g., Yoycol's templates)
- Open it in Photopea (free, browser-based) or Photoshop
- Create your design on a new layer above the template
- Export as PNG at 300 DPI, RGB, sRGB
- Upload to your POD supplier and preview with their 3D mockup tool
5 Common AOP Design Mistakes (And How to Avoid Them)
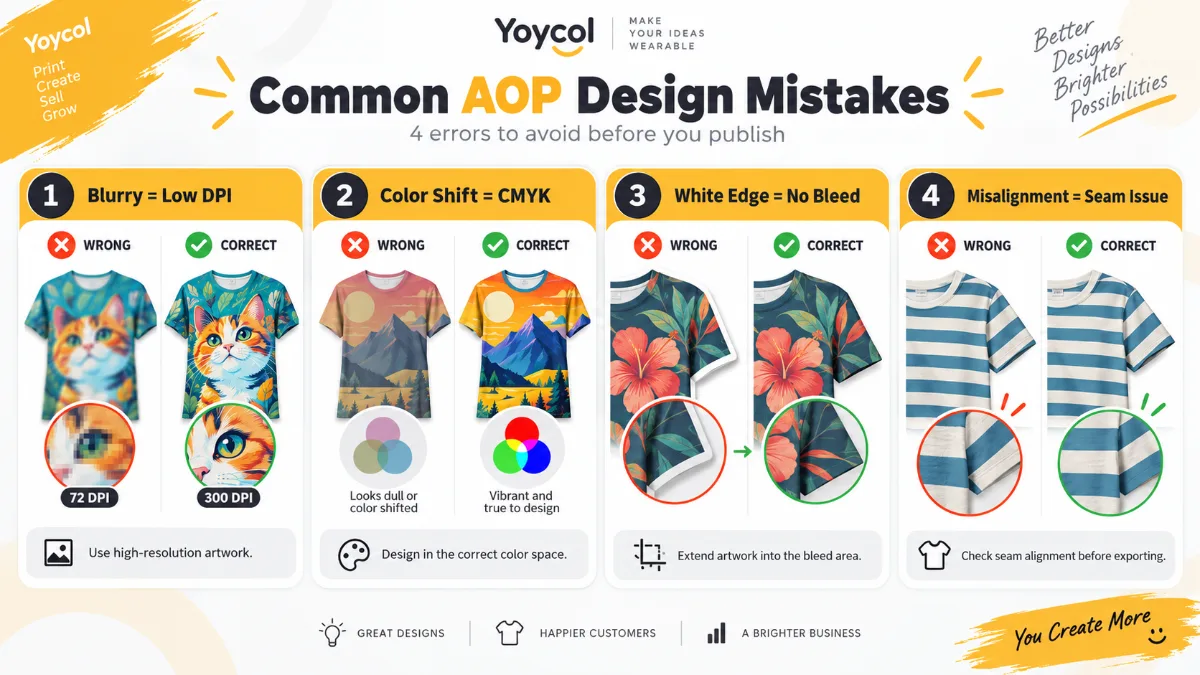
After reviewing thousands of AOP designs, these are the mistakes that cause the most production issues:
Mistake 1: Wrong Resolution
- Problem: File is 72 DPI (web resolution) instead of 300 DPI → prints look blurry
- Fix: Always create files at 300 DPI. In Photoshop: Image → Image Size → set Resolution to 300
Mistake 2: Using CMYK Instead of RGB
- Problem: Colors shift dramatically after printing (blues become purple, reds become orange)
- Fix: Work in RGB color mode. In Photoshop: Image → Mode → RGB Color
Mistake 3: No Bleed Area
- Problem: White edges appear after cutting because the design doesn't extend far enough
- Fix: Extend your design 2-3cm beyond every cut edge. Keep important elements away from the edges.
Mistake 4: Misaligned Seam Patterns
- Problem: Patterns don't match up at the seams after the garment is sewn
- Fix: Use the template's seam line guides. Design patterns that are forgiving of small misalignments (abstract, organic patterns work better than precise geometric grids).
Mistake 5: Designing for Flat, Not for Body
- Problem: Design looks great on the flat template but looks weird when worn (e.g., a face that gets stretched across a seam)
- Fix: Use the 3D mockup preview to see how your design looks on a body, not just on a flat template. Test with the supplier's preview tool before publishing.
How to Create Seamless Repeating Patterns for AOP
One of the most popular AOP design styles is the seamless repeating pattern — small motifs (flowers, stars, geometric shapes) repeated edge-to-edge.
Here's how to create one:
Step-by-Step (Photoshop / Photopea)
- Create a new square canvas (e.g., 2000 × 2000 px at 300 DPI)
- Design your motif in the center of the canvas
- Go to Filter → Other → Offset — set horizontal and vertical offset to half the canvas width (1000px)
- Fill the gaps created by the offset with copies of your motif
- Repeat the offset process until the pattern tiles seamlessly
- Test by using Edit → Define Pattern and filling a large canvas
Step-by-Step (Canva — Easier Method)
- Create a custom size design (match your product template dimensions)
- Search "seamless pattern" in Canva elements
- Choose a pattern you like and customize the colors
- Resize to fit your product template
- Download as PNG
Free Pattern Resources
- Vecteezy — 21,000+ free AOP vector patterns
- Patternico — Free seamless pattern generator
- Repper — Create patterns from any image ($30 one-time)
How to Preview Your AOP Design Before Publishing
Never publish an AOP design without previewing it first. Here's why:
- Colors on screen ≠ colors in print (calibrate your monitor)
- Patterns that look good flat may look weird on a body
- Small details may disappear when printed at scale
Preview Methods
| Method | How | Best For |
|---|---|---|
| Yoycol 3D Mockup | Upload design → see it on 3D model | Realistic body preview |
| Supplier 2D Preview | Upload → see flat design on product template | Check alignment & bleed |
| Order a Sample | Print one unit → see real colors & quality | Final check before mass selling |
Pro tip: Always order at least one sample of a new design before listing it. The $10-15 sample cost saves you from bad reviews on a product that looks different in person.
For more on creating product mockups that convert browsers into buyers, our guide on how to create product mockups that sell covers photography and presentation tips.
Frequently Asked Questions
What size should my all-over-print design be? It depends on the product. Standard AOP t-shirt templates are 6000×7200 pixels at 300 DPI (20"×24"). Hoodies are larger (8400×9600 px). Always download the specific template from your POD supplier — they provide exact dimensions for each product.
What file format is best for AOP designs? PNG is recommended for best quality. JPEG is acceptable if file size is an issue. Always use RGB color mode (not CMYK) and sRGB color profile. Resolution must be 300 DPI.
Can I use Canva for all-over-print designs? Yes. Canva works for simple AOP designs, especially pattern-based layouts. For more complex designs with precise seam alignment, Photoshop or Photopea (free) gives you more control.
Do I need to include a bleed area in my AOP design? Yes. Extend your design 2-3cm beyond every cut edge. Without bleed, your printed product may have white borders after cutting. This is the #1 mistake new AOP designers make.
Where can I get free AOP design templates? Yoycol provides free design templates for every product in their catalog. Vecteezy and Patternico also offer free seamless patterns you can adapt for AOP products.
How do I check if my design will print correctly? Use your POD supplier's preview tool (like Yoycol's 3D Mockup Generator) to see the design on a realistic product model. For final verification, order a physical sample before publishing.
All-over-print design templates look intimidating at first — the dimensions are large, the layout is unusual, and the bleed area adds complexity. But once you understand the structure and follow the file requirements, it becomes routine.
The key rules: 300 DPI, RGB, sRGB, include bleed, and always preview in 3D before publishing.
Get these right, and your AOP designs will print perfectly every time.
Ready to start designing? Try Yoycol's free 3D Mockup Generator →
This guide is part of our all-over-print series. Learn how to design AOP products step-by-step or discover the best AOP products to sell.